Chapter 1: Revit Interface
1.1 OPENING A REVIT SAMPLE PROJECT
- Start the Revit application
- Once Revit Home loads, click the Open button
- Navigate to the C:/Program Files/Autodesk/Revit 2019/Samples/
- Select the file rac_basic_sample_project
- Click Open
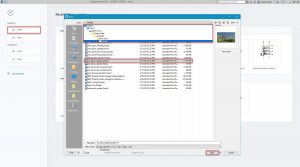
Figure 1.1 Opening a Revit sample project
1.2 BECOMING FAMILIAR WITH THE REVIT INTERFACE
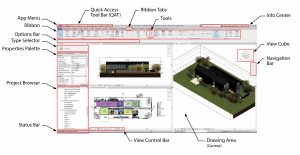
Figure 1.2 Revit Interface components
Description of Revit components
| Tab | Organizes tools based on the main function such as Architecture, View, or Massing. |
| Ribbon | Provides tools to create elements or components of a project or family along with other commands |
| Tools | Individual icons available to initiate a command |
| Option Bar | Displays options available to alter the function of a command |
| Type Selector | Identifies the currently selected family type and provides a drop-down menu from which a different type can be chosen such as a wall or roof material or construction |
| Properties Palette | Used to view or modify the parameters that define the properties of elements or canvas |
| Project Browser | Provides access and organizes the views, schedules, and sheets of the project |
| Status Bar | Provides tips or hints on what to do with the selected element or component |
| Info Center | Provides searchable help options and the app store icon |
| View Cube | Available in 3D view and adjusts the view settings |
| Navigation Bar | Available in 3D and 2D to adjust the zoom and view settings |
| View Control Bar | Quick access to functions that affect the current view |
1.3 ACCESSING INTERFACE COMPONENTS
- Above the ribbon, click the View tab
- Click the User Interface icon

- One at a time un-check and check each box to become familiar with the components and their names. For help, reference Figure 1.3
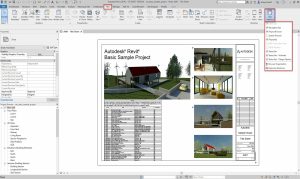
Figure 1.3 Customizing the User Interface
Opening the Ribbon
- Above the ribbon, to the right of the tabs, click the icon
 as shown in Figure 1.4
- Option 1: Click the drop-down arrow and click the option individually
- Option 2: Click the icon to cycle through the options
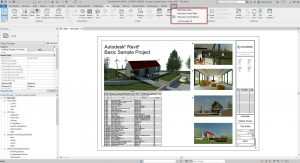
Figure 1.4 Ribbon display options
Opening the Properties Palette
- There are two ways of accessing the Properties Palette
- Option 1: shown in Figure 1.3
- Click the View tab
- Click the User Interface icon
- Click Properties Palette
- Option 1: shown in Figure 1.3
-
- Option 2: shown in Figure 1.5
- Right-click on the canvas
- Click Properties Palette
- Option 2: shown in Figure 1.5
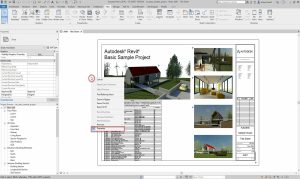
Figure 1.5 Accessing the Properties Palette
Opening the Project Browser
- There are two ways of accessing the Project Browser
- Option 1: shown previously in Figure 1.3
- Click the View tab
- Click the User Interface icon
- Click Properties Palette
- Option 1: shown previously in Figure 1.3
-
- Option 2: shown in Figure 1.6
- Right-click on the canvas
- Click Browsers
- Click Properties Palette
- Option 2: shown in Figure 1.6
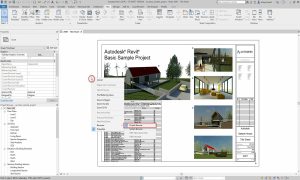
Figure 1.6 Accessing the Project Browser
1.4 PROJECT BROWSER
Open Views
- Open the following views from the Project Browser by double-clicking the name as shown in Figure 1.7
- Floor Plan: Level 1
- 3D views: {3D}
- Elevation: West
- Schedule: Planting Schedule
- Sheet: A101 – Site Plan
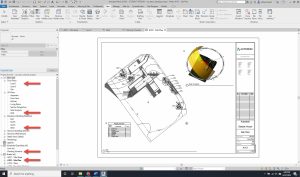
Figure 1.7 Opening views from the Project Browser
Place family elements
- In the 3D view, scroll down the Project Browser to Families
- Click the + icon to expand the section
- Expand Planting
- Expand RPC Tree-Deciduous as shown in Figure 1.8
- Click and drag to place a Hawthorne-25
- Place 5 more of any tree
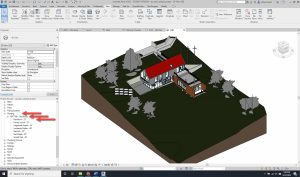
Figure 1.8 Families in the Project Browser
TIP
Press the Space bar to rotate an element
Project Browser search bar
- Right-click in the Project Browser
- Choose the option to Search
- Type Bathroom
- Toggle through the matches by clicking the Next and Previous buttons as shown in Figure 1.9

Figure 1.9 Project Browser Search
1.5 PROPERTIES PALETTE
Type Selector
- In the 3D view, select the roof
- Click the Type Selector
- Choose Warm Roof – Timber as shown in Figure 1.10
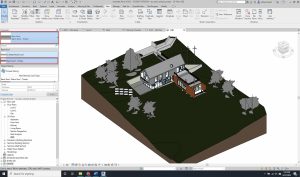
Figure 1.10 Type Selector: Warm Roof – Timber
Crop View
- In the West elevation view, go to the Properties Palette
- Scroll down to the Extents section
- Click to check the box next to Crop View
- Click to check the box next to Crop Region Visible
- Click and hold a blue dot
 to adjust the boundary box
 - Pull the blue dot over the elevation drawing and release the blue dot
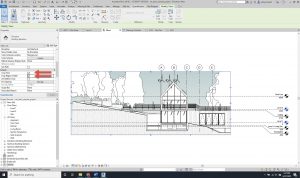
Figure 1.11 Crop Box Extents
Section Box
- In the 3D view, go to the Properties Palette
- Scroll down to the Extents section
- Click to check the box next to Section Box
- Click on the Section box
- Use the double blue arrows
 to adjust the section box extents
 - Pull in a side of the cube to cut through the building as shown in Figure 1.12
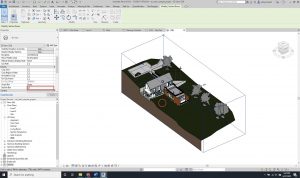
Figure 1.12 Section Box
TIP
If the Section Box does not show up, refer to Chapter #: Troubleshooting and Tips
1.6 NAVIGATING THE CANVAS
View Cube
The View Cube consists of two components; the Cube and the Compass as shown in Figure 1.13.
- The Cube is used to pivot around the 3D model using preset views by clicking the corners, edges, and faces.
- Or click and hold the Cube while dragging the cursor around to pivot both horizontally and vertically.
- The Compass pivots around the 3D model without changing the view vertically. Click and hold on the compass and drag the cursor left and right

Figure 1.13 View Cube
2D Wheel
- The top icon is called the Full Navigation Wheel. Click this icon and hover the cursor over the canvas.
- Options available to adjust the view: Zoom, Orbit, Rewind, Pan, Walk, Center, Look and Up/Down
- In both 2D and 3D views, there are two methods for zooming.
- Use the 2D wheel to zoom incrementally by options as shown in Figure 1.14
- Use the cursor scroll wheel to zoom in and out
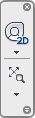
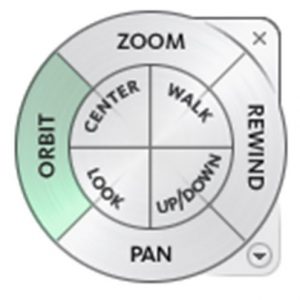
Figure 1.14 2D Wheel (left) and Full Navigation Wheel (right)
Panning
- Click the cursor scroll wheel anywhere on the canvas and hold it down
- Drag the cursor in any direction to move the around the canvas
Hidden Objects
- Select an element in either 2D or 3D
- Right-click then select Hide in View
- Choose one of the following
- Hide Element – will hide only the items selected
- Hide Category – will hide all items under the same category
- Click the Reveal Hidden Items icon
 on the View Control Bar to see hidden elements
 - Select the element to reveal
- Right-click then select Unhide in View
- Choose either Element or Category
- Click the Reveal Hidden Items icon
 to close the reveal
Detail Level
- Click the Detail Level icon
 on the View Control Bar to change the level of detail between Coarse, Medium, and Fine
Visual Style
- Click the Visual Style icon
 on the View Control Bar to change the project view between Wireframe, Hidden Line, Shaded, Consistent Colors, Realistic, or Ray Trace.
