Chapter 11: Workflow | Worksharing
11.1 WORKFLOW
CAD and BIM users within a firm follow the same design and construction phases that answer the what, where, and how, but the time and payroll spent in each phase varies between the programs.
CAD versus BIM workflow
CAD
In the CAD program, there is one 2D drawing per file that is then linked into another file for reference, so important elements align such as exterior walls or structure. Elevations and interior wall designs are orthographically projected from linked floorplans to create vertical information. When changes are made to a project a team member is required to edit each file individually.
Firms created a guide from experience on how many hours it generally takes to complete tasks at each of the 4 design phases. When using CAD more hours are used from the design development through the construction documentation phase.
BIM
In the BIM program, all 2D and 3D drawings are in one file where the 3D model automatically produces all necessary plans, sections, elevation, and rendered views. BIM uses GIS data (Geographical Information Systems) to position a project where the environment’s sun angle or average temperature can accurately predict daylight studies, energy analysis, and material performance. For example, a wall envelope can include the R and U values of insulation or windows to test the energy efficiency.
Structural, MEP, and HVAC designs are typically created by an engineering firm then linked into the architecture file. Engineering design requirements can alter the architectural design such as codes that determine airflow or CFD (Computational fluid dynamics). A project may require the ceiling cavity to be increased to house the appropriate HVAC system that controls the airflow.
BIM generally uses the same number of hours from the Conceptual and Schematic phase through the Design Development, but it offers a significant decrease in hours to complete the Construction Document phase. When a change is made in any view of the model whether it be 2D or 3D, all other views are adjusted simultaneously.
BIM Roles
Typically there are 3 types of employees needed to complete the construction documentation and they are the Architect, the Model Maker, and the Draft Organizer.
The Architect
The Architect is typically the real architect in control of the project. This person oversees the design decisions, construction feasibility, material choices, code requirements and makes sure the project is consistent from beginning to end.
The Model Maker
The Model Maker is responsible for building the 3D model and 2D views which include families of windows, doors, casework, structure components (in walls, floors, roofs, etc.) and any other items accounted for in a CD set.
The Draft Organizer
The Draft Organizer takes all views from the Model Maker and the codes and requirements from the Architect and sets up all sheets, schedules, and views then apply detailed information such as dimensions, keynotes, and annotations.
11.2 WORKSHARING
Worksharing allows more than one user to access the same model and work simultaneously. Users work from individual local Revit files. Each local file communicates to the central model that is located to a Cloud-based system under the C:/ of each user’s computer.
Install Google Drive/DropBox
Each user needs to follow these steps to locate the Google Drive in the appropriate folder.
The following steps are for users who have not downloaded Google Drive or DropBox to their personal devices before. If Google Drive is already on the computer, please skip to the next section.
TIP
- To use Google Drive, go to https://www.google.com/drive/download/ and click the personal download button.
- Follow the installation instructions
- When the download is complete, log in to the google account
- Under the My Laptop tab, uncheck the Desktop, Documents, and Pictures options.
- On the left panel, click to open Google Drive
- A user can sync every folder in Google Drive or just specific folders. Select the folders that are needed for quick access when working on a project.
TIP
- Folders that sync to the hard drive do take up space on the computer, only sync what is necessary to link to the project. This can help reduce lagging
- If a new account is created, try following a folder nomenclature
- 00_Central File (save the central here)
- 01_Project Families (save all family files here)
- 02_Project Masses (save all massing files here)
- 03_Project Materials (save all material, images, etc here)
- Change the folder location to the computers C:/ drive. This is the most important part because each user’s folder address has to be exactly the same to access the project. For example C:/Google Drive/00_Central File
- Click OK to allow the files to sync
Relocate an existing Google Drive to the C:/
The following steps are for users who have downloaded Google Drive or DropBox to their personal devices before. Google Drive does not allow you to change the file location after an account has already been synced therefore you need to “Quit Back Up and Sync”.
There are two methods to changing the file location to a Google account that is already active on your desktop.
Option 1:
- Access the Google Back up and Sync
 that is located on the computer tool bar
 - Select the Settings icon (3 dots)
- Select Quit Backup and Sync
- Open the File Explorer and locate the Google drive folder
- Copy and Paste the folder into the C:/ drive
- Delete the original Google Drive folder
- Re-open the Backup and Sync
- The program will prompt you to locate the missing file, select the Locate button
- Use the Browse for folder window to access the C:/ drive and select the new Google Folder
- Another window will appear asking you to confirm this choice, select Confirm
Option 2:
- Access the Google Back up and Sync that is located on the Windows tool bar
- Select the Settings icon (3 dots)
- Select Preferences
- Go to the Settings tab on the left of the window
- Click the disconnect account icon
- This will sign out of the account
- Move the Google Folder to the C:/
- Access the Google Back up and Sync that is located on the Windows tool bar
- Select the Settings icon (3 dots)
- Select Backup and Sync
- Sign into the account
- Go to the Google Drive tab on the left
- A blue underlined “Change..” will be available to choose a new location
- Select Start to begin syncing
TIP
- If this does not work follow these steps
- Access the Google Back up and Sync
- Uninstall from the Add/Remove Programs
- Download using the previous instructions
- Access the Google Back up and Sync
Set up a Central File
Only one person from the group needs to complete these instructions
- Open the Revit application
- Click New on the left side of the home page
- Choose the Architectural model from the drop-down menu
- Click OK
- Click the Collaborate tab
- Click the Workset icon

- A window will open “You are about to enable Worksharing.” Click OK
- In the Workset window, worksets can be separated by group members name or by construction sections such as Exterior Shell, Interior Partitions, Egress Core, etc.
- Select New
- Enter their name
- Click okay to accept their name
- Click OK once all names have been added to exit the Worksets window
- Click OK
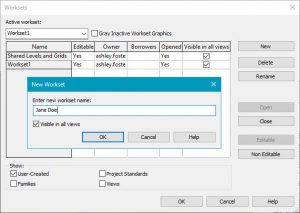
Figure 11.1 Workset window with created user worksets - Click File, Save As
- Select the Project Option
- Choose the Central File folder created in the Google drive account in the C:/
- Title the file “Project Title_Central Model”
- Click Options on the bottom right corner
- Check the box next to Create Central Model
- Click OK to close the Options window
- Click OK to save the project
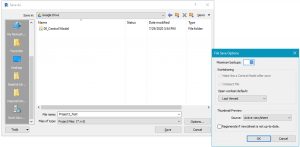
Figure 11.2 Save as window to create a Central Model
Set up Local Files
All users from the group need to complete these instructions
- Open Revit
- On the Home Page click Open
- Locate the Central File
- At the bottom of the Open window make sure the Create New Local is checked
- Click Open
- Revit will automatically choose the Document folder to save the local file. Do not change this.
Access the local Revit model
There are two methods to access a Revit project.
Option 1:
- Open Revit then locate the local file from the Document folder
Option 2:
- Click on the Central Model that appears in the main space of the Revit Home Page
- A window will open asking “By opening this central model, you will create a local copy of it”
- Choose to “Append timestamp, to existing copy” or “Overwrite existing copy”
- Timestamp creates a new timestamped file
- Overwrite saves a new local file over the existing local file
- Once the Local file is open, go to the Collaborate tab
- Click the Workset Icon
- Use the Drop-down menu under editable and choose Yes
- Click OK
WorkSharing important icons
-
-
- Synchronize model
 : Uploads all the work a user has done and saves it to the central model for the other users to see
 - Reload Latest
 : Loads what other users synchronize after the opening of a project
 - Relinquish Mine
 : Releases all work done that allow other users to make edits or updates
- Synchronize model
-
Important notes when working from a cloud shared model
- Always Synchronize and Relinquish Mine before closing the project
- Assign group members model/building elements by topics such as Floors, Walls, Windows, Doors, Legends, Sheets, etc.
- Save the file often without syncing to the central
- Communicate with the other users before clicking the Synchronizing(updating)
- Only synchronize the model with the Google drive icon shows the arrow point upward
- Never synchronize when the arrows form a circle
 – this means the central model is updating. If members synchronize at the same time the Central file will corrupt and progress will be lost
- Only synchronize the model with the Google drive
- If the Central File is corrupt
- A user who can access the file should go to the Collaborate tab
- Click the Manage Model drop-down menu
- Click Repair Central Model

- Sometimes another error may occur where all the work is lost.
- Save-As the corrupt local file by another name and close
- Open the local file again
- Try to copy, paste the elements over
- If the internet connection is lost
- Wait until it is back up to sync before closing the file
- Save-As under a new name
- If the computer needs to be shut down then try to copy/paste it over later
- Randomly one user may end up with control rights to another user’s work.
- Open the file
- Go to the Collaborate tab
- Click Relinquish Mine
- Click Sync separately
