Lab Activities
For this lab only, there will be three stations for each group to cycle through, stations one, two and three; stations four, five and six will mirror these stations for this lab only. A list of words is provided below that you are expected to identify, learn, and label on the models provided. You must use all the words provided. Using the colored tape provided, write the number that corresponds to the organ/structure and place it on your model. When complete, notify your TA so they may check your work.
Note: Do not simply label the models, it is crucial that you understand how to apply all of these terms in each system, for the rest of the semester!
For each additional station, directions will be provided for the particular activity.
Stations One and Six: Histology
This is an advanced biology class, therefore you all likely have experience with microscopes. However, use these stations to refresh your memory of proper microscope etiquette, how to focus on a slide, and identify key features. For the remainder of this class, you will be expected to identify various tissues under the microscope. Be sure to ask your TA for assistance, and remember taking a picture of the slide to study later is not helpful if you don’t take the time to study it in lab and understand which aspects are most important.
Basic instructions for use:
- Turn on the microscope. Move he stage down to its lowest setting and adjust the iris diaphragm until it allows the least amount of light in.
- Put the slide in position on the stage and be sure to start with the 5x objective to view it. While looking through the eyepiece, use the stage controls to move the specimen in line with the objective.
- Using the coarse adjustment knob, bring the stage up until you can see the specimen. Remember, it will not be in focus! If you bring the stage up too high, then switching to a higher objective, may touch the slide, scratch the lens, or even break the slide. Instead, use the fine adjustment knob to clarify the image and the iris diaphragm to allow as much light in as needed.
- Once the 5x is in focus, you can move to the next objective. Use the fine adjustment knob to focus before moving to the next objective. Do NOT touch the coarse adjustment knob.
- When you finish using the microscope, move the 5x objective to the start position and move the stage back down to its lowest position.
Sketch the slides available for today’s lab and indicate the magnitude at which you are observing/sketching. Be sure to identify, include, and label your sketch with the corresponding structures listed beneath each slide. Use the images provided to guide you through this process.
-

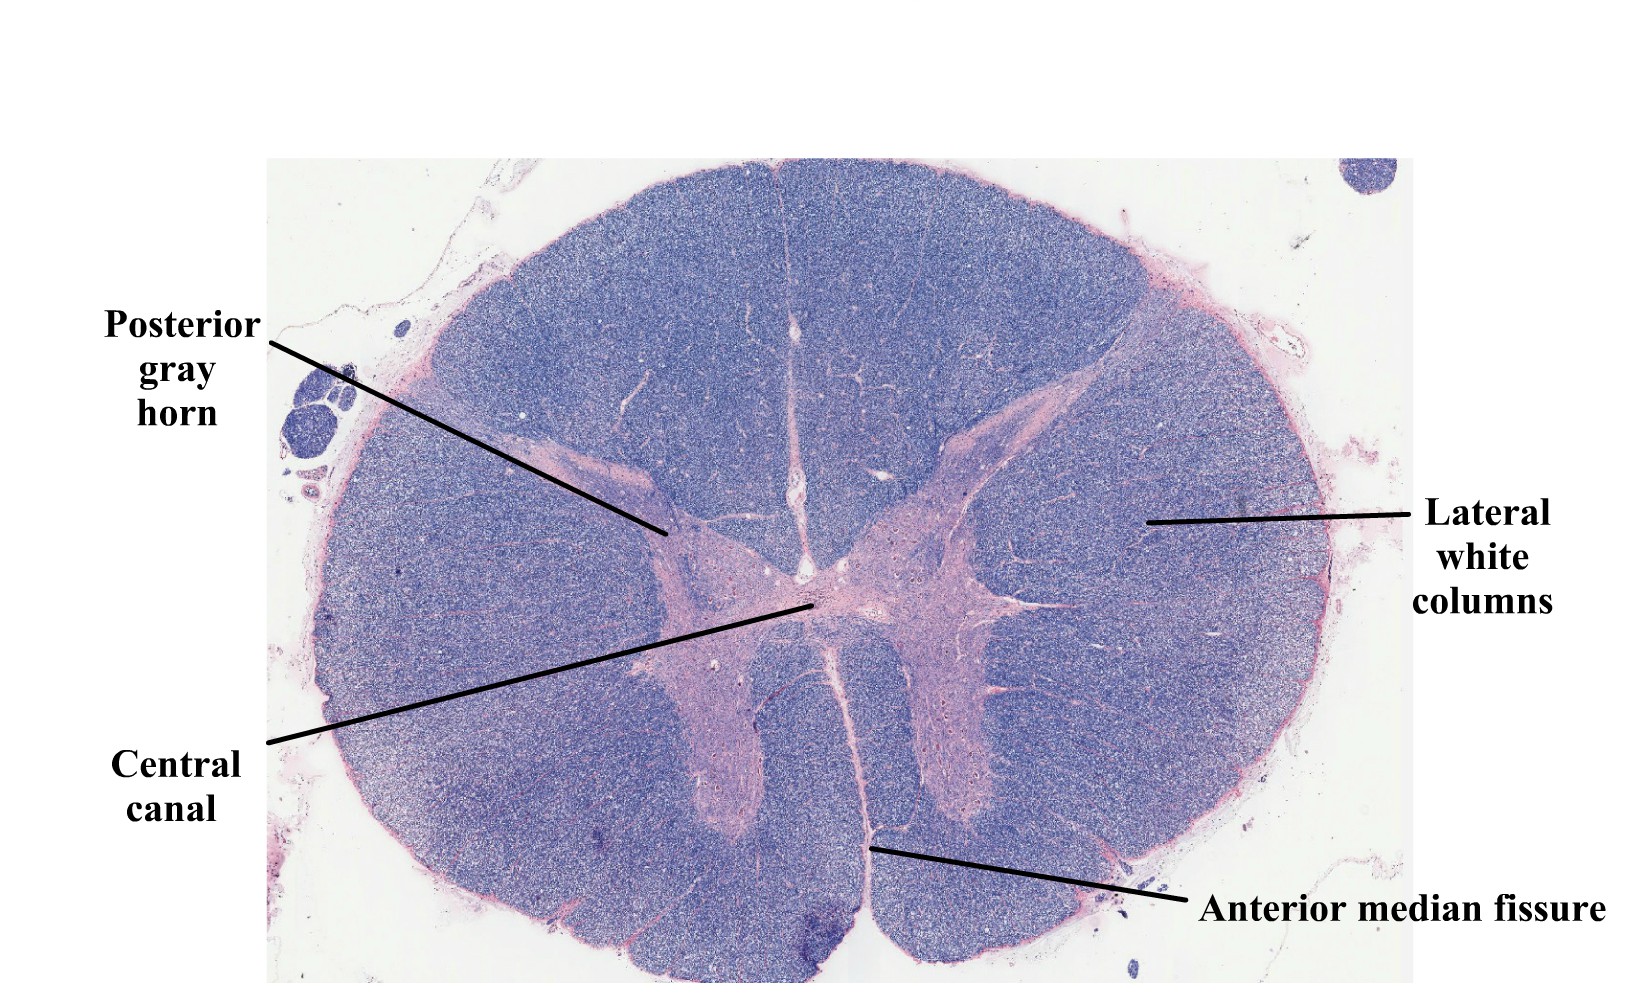
- Spinal Cord
-

- Kidney
-
- Spinal Cord
-
- Kidney

|
|
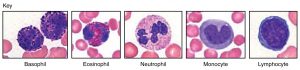
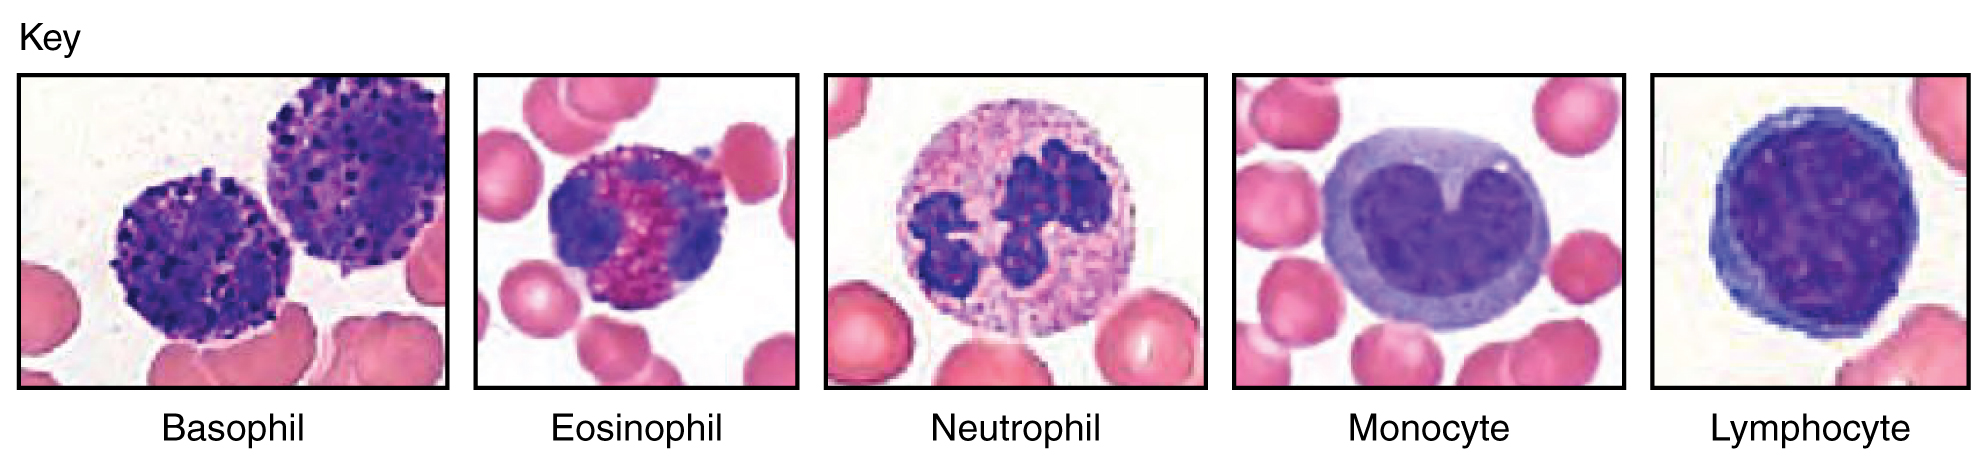
| Monocyte |
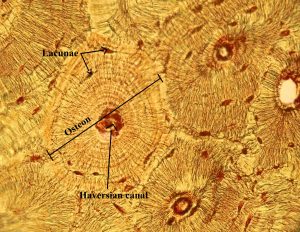
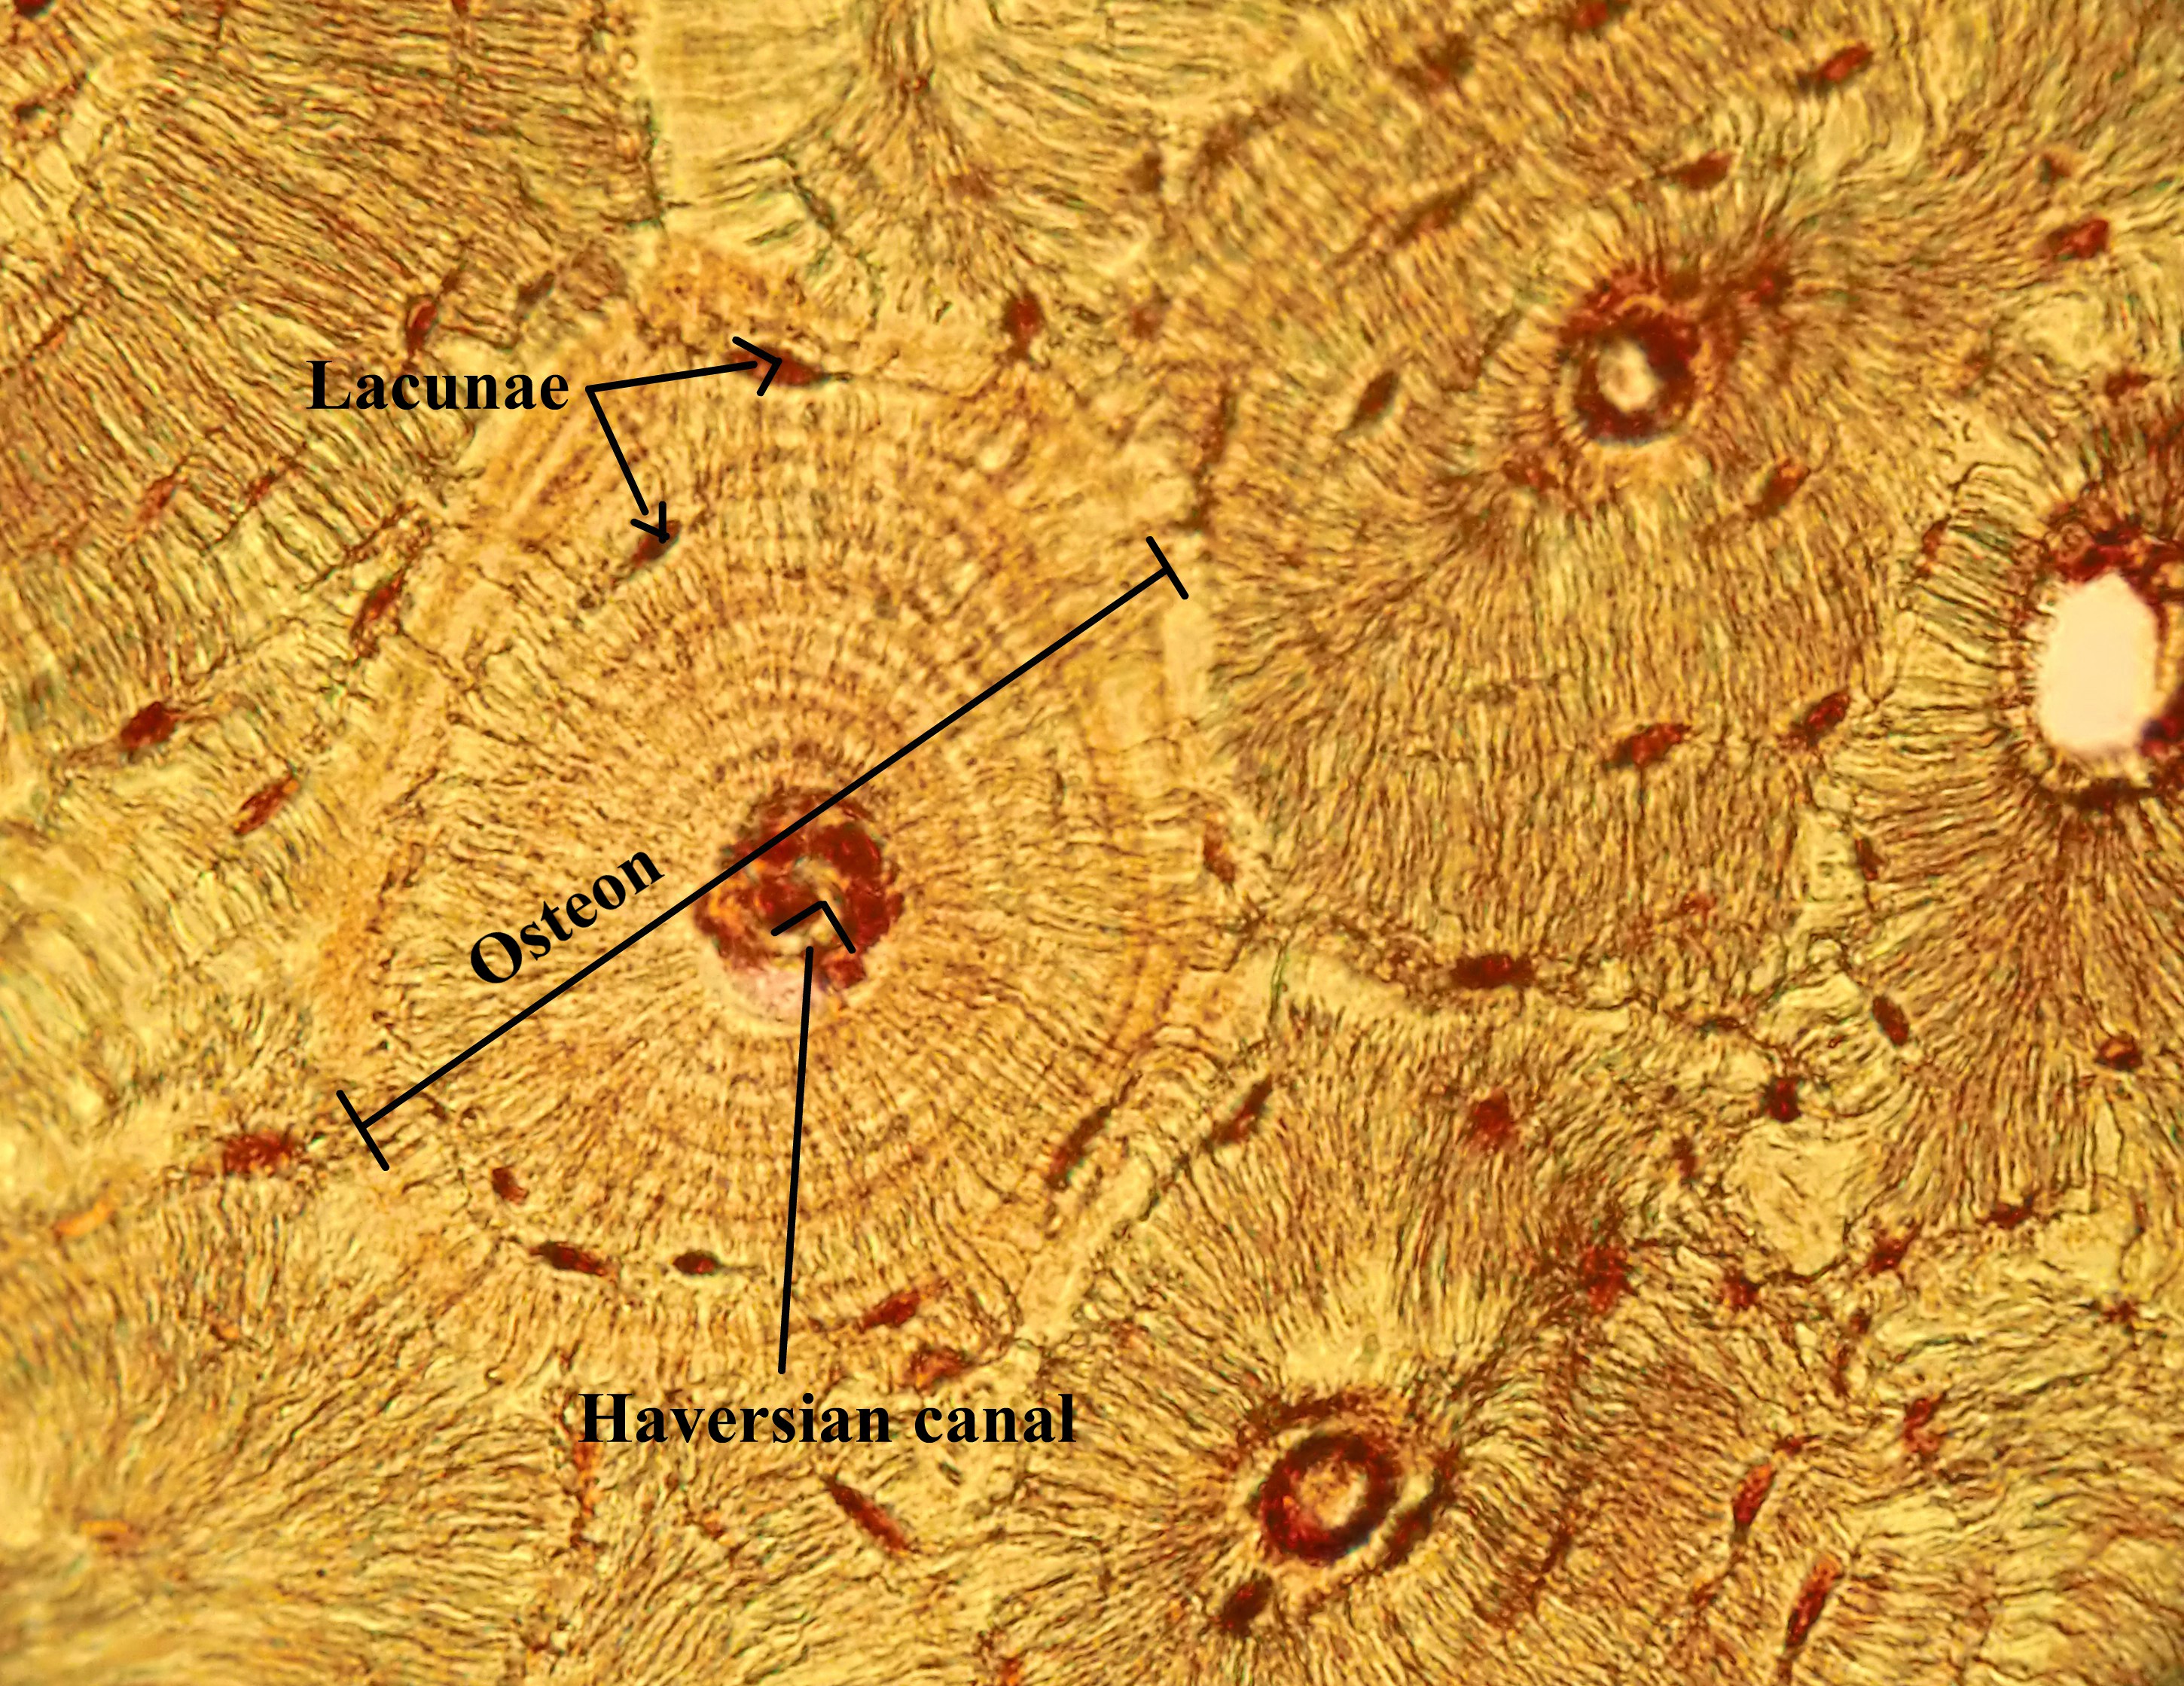
Compact Bone |
 |
 |
|
|
|
Spinal Cord |
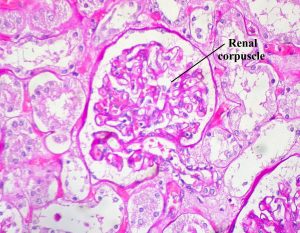
Kidney |
 |
 |
Stations Two and Five: The Basics
The terms in the following tables are important in understanding the relationship between different organs and structures of the body. Using the models and diagrams in your atlas, learn how to identify the different body planes and the appropriate use of directional terms. When trying to understand body movements, it is helpful to act them out yourself.
Label the torso models of this station with the number that corresponds to the appropriate regions of the abdominal cavity using the colored tape. When you are finished, ask your TA to check your labeling. Before leaving the station, remove all of the labels you have placed on the model. Note the locus of each organ within each region.
Body Planes
|
#1 frontal |
#2 transverse |
#3 sagittal |
Directional Terms
|
#4 anterior |
#7 inferior |
#10 proximal |
#13 superficial |
|
#5 posterior |
#8 lateral |
#11 distal |
#14 parietal |
|
#6 superior |
#9 medial |
#12 deep |
#15 visceral |
Abdominal Regions
|
#16 right hypochondriac region |
#19 right lumbar region |
#22 right iliac region |
|
#17 epigastric region |
#20 umbilical region |
#23 hypogastric region |
|
#18 left hypochondriac region |
#21 left lumbar region |
#24 left iliac region |
Stations Three and Four: Regions of the Body
Label the models of this station with the number that corresponds to the appropriate structure of the peripheral nervous system using the colored tape. When you are finished, ask your TA to check your labeling. Before leaving the station, remove all the labels you have placed on the model.
Anatomical Regions
|
#1 cephalic |
#11 brachial |
#21 abdominal |
#31 femoral |
|
#2 cranial |
#12 cubital |
#22 hepatic |
#32 patellar |
|
#3 ocular (orbital) |
#13 antecubital |
#23 renal |
#33 popliteal |
|
#4 auricular (otic) |
#14 olecranal |
#24 umbilical |
#34 crural |
|
#5 buccal |
#15 antebrachial |
#25 lumbar |
#35 sural |
|
#6 nasal |
#16 carpal (carpus) |
#26 pelvic |
#36 tarsal (tarsus) |
|
#7 oral |
#17 palmar |
#27 inguinal |
#37 calcaneal |
|
#8 cervical |
#18 digital (phalangeal) |
#28 pubic |
#38 pedal |
|
#9 acromial |
#19 thoracic |
#29 sacral |
#39 plantar |
|
#10 scapular |
#20 mammary |
#30 gluteal |
|
Common Anatomical Features
The following terms are useful to know and understand as they will reappear throughout this course.
|
#40 process |
#45 sulcus |
#50 facet |
#54 septum |
|
#41 tuberosity |
#46 gyrus |
#51 fossa |
#55 raphe |
|
#42 condyle |
#47 foramen |
#51 fundus |
#56 ampulla |
|
#43 epicondyle |
#48 foramina |
#52 hilum |
|
|
#44 fissure |
#49 meatus |
#53 isthmus |
|
