9 Organizing Research: Taking and Keeping Effective Notes
Once you’ve located the right primary and secondary sources, it’s time to glean all the information you can from them. In this chapter, you’ll first get some tips on taking and organizing notes. The second part addresses how to approach the sort of intermediary assignments (such as book reviews) that are often part of a history course.
Honing your own strategy for organizing your primary and secondary research is a pathway to less stress and better paper success. Moreover, if you can find the method that helps you best organize your notes, these methods can be applied to research you do for any of your classes.
Before the personal computing revolution, most historians labored through archives and primary documents and wrote down their notes on index cards, and then found innovative ways to organize them for their purposes. When doing secondary research, historians often utilized (and many still do) pen and paper for taking notes on secondary sources. With the advent of digital photography and useful note-taking tools like OneNote, some of these older methods have been phased out – though some persist. And, most importantly, once you start using some of the newer techniques below, you may find that you are a little “old school,” and might opt to integrate some of the older techniques with newer technology.
Whether you choose to use a low-tech method of taking and organizing your notes or an app that will help you organize your research, here are a few pointers for good note-taking.
Principles of note-taking
- Start out how you mean to go on, and guard from the beginning against losing notes.
- If you are going low-tech, choose a method that prevents a loss of any notes. Perhaps use one spiral notebook, or an accordion folder, that will keep everything for your project in one space. If you end up taking notes away from your notebook or folder, replace them—or tape them onto blank pages if you are using a notebook—as soon as possible.
- If you are going high-tech, pick one application and stick with it. Using a cloud-based app, including one that you can download to your smart phone, will allow you to keep adding to your notes even if you find yourself with time to take notes unexpectedly.
- Never fail to write down source information.
- When taking notes, whether you’re using 3X5 note cards or using an app described below, write down the author and a shortened title for the publication, along with the page number on EVERY card. We can’t emphasize this point enough; writing down the bibliographic information the first time and repeatedly will save you loads of time later when you are writing your paper and must cite all key information.
- Start thinking analytically about the argument as soon as you can. Use those ideas to label and organize your notes.
- Include keywords or “tags” that capture why you thought to take down this information in a consistent place on each note card (and when using the apps described below). If you are writing a paper about why Martin Luther King, Jr., became a successful Civil Rights movement leader, for example, you may have a few theories as you read his speeches or how those around him described his leadership. Those theories—religious beliefs, choice of lieutenants, understanding of Gandhi—might become the tags you put on each note card.
- Note-taking applications can help organize tags for you, but if you are going low tech, a good idea is to put tags on the left side of a note card, and bibliographic info on the right side.
Organizing research- applications that can help
Using images in research
- If you are in an archive: make your first picture one that includes the formal collection name, the box number, the folder name and call number and anything else that would help you relocate this information if you or someone else needed to. Do this BEFORE you start taking photos of what is in the folder.
- If you are photographing a book or something you may need to return to the library: take a picture of all the front matter (the title page, the page behind the title with all the publication information, maybe even the table of contents).
Once you have recorded where you find it, resist the urge to rename these photographs. By renaming them, they may be re-ordered and you might forget where you found them. Instead, use tags for your own purposes, and carefully name and date the folder into which the photographs were automatically sorted. There is one free, open-source program, Tropy, which is designed to help organize photos taken in archives, as well as tag, annotate, and organize them. It was developed and is supported by the Roy Rosenzweig Center for History and New Media at George Mason University. It is free to download, and you can find it here: https://tropy.org/; it is not, however, cloud-based, so you should back up your photos. In other cases, if an archive doesn’t allow photography (this is highly unlikely if you’ve made the trip to the archive), you might have a laptop on hand so that you can transcribe crucial documents.
Using note or project-organizing apps
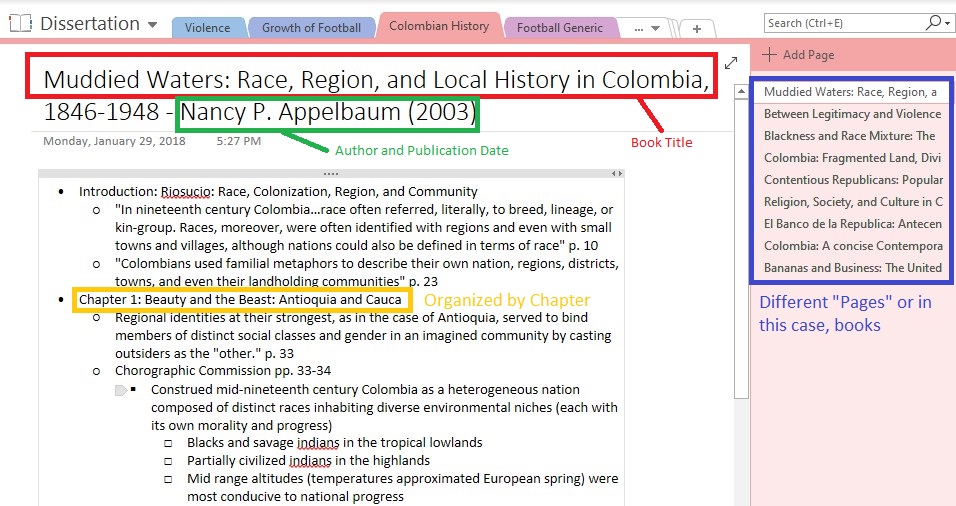
When you have the time to sit down and begin taking notes on your primary sources, you can annotate your photos in Tropy. Alternatively, OneNote, which is cloud-based, can serve as a way to organize your research. OneNote allows you to create separate “Notebooks” for various projects, but this doesn’t preclude you from searching for terms or tags across projects if the need ever arises. Within each project you can start new tabs, say, for each different collection that you have documents from, or you can start new tabs for different themes that you are investigating. Just as in Tropy, as you go through taking notes on your documents you can create your own “tags” and place them wherever you want in the notes.
Another powerful, free tool to help organize research, especially secondary research though not exclusively, is Zotero found @ https://www.zotero.org/. Once downloaded, you can begin to save sources (and their URL) that you find on the internet to Zotero. You can create main folders for each major project that you have and then subfolders for various themes if you would like. Just like the other software mentioned, you can create notes and tags about each source, and Zotero can also be used to create bibliographies in the precise format that you will be using. Obviously, this function is super useful when doing a long-term, expansive project like a thesis or dissertation.
